Basic Stitches
Ready to start embroidering? Before you stitch, you'll need to prepare a few simple materials. (Check the Embroidery DIY tutorials first to Get Started.)
Now let's learn some basic stitches!

The Straight Stitch is the most basic embroidery stitch. Bring your needle and floss up through the fabric at A and back down again at B. Straight stitches can be stitched individually, to form shapes or patterns, or in a line. A line of Straight Stitches is called a Running Stitch.
The Satin Stitch is way to fill a small area with color, and is really just a bunch of Straight Stitches made close together. Make a Straight Stitch from A to B. Make another Straight Stitch right next to it from C to D. Continue back and forth across the area you want to cover.
You can make some fun embroidery designs with just these easy stitches! Look at this:

Step 1. Pull the needle and floss through the fabric from the back until the knot catches.
Step 2. Now push the needle back down through a little ways away and pull the floss tightly to the fabric. You've made a Straight Stitch!
Step 3. Keep making Straight Stitches in a line. You can make them all the same length, short or long, far apart, or very close together to get the effect you want. Now you've made a Running Stitch. When you're done with your line, tie a knot on the back and start with another color.
Step 4. Now make a few Straight Stitches side by side, going back and forth. This is a Satin Stitch and it's great for small, solid shapes.
Step 5. Use a third color to make a few more Straight Stitches in flower and leaf shapes.
Step 6. Voila! You've stitched a sweet little flower vine. Great job!
Cute, right? And easy!

You can also stitch Straight Stitches criss crossing in different ways, or all ending at the same center point to create Star Stitches. Embroider a bunch of stars together with some French Knots (see the More Stitches tutorial in Embroidery DIYs) and create a lovely night sky.
Ready for more Basic Stitches?
First up, Outline Stitches. These are stitches you can use for the main outlines of any embroidery pattern, the stitches you "draw" with. Each of these looks a little bit different, try them out to see which you prefer, or use them all in different parts of your work.

The Back Stitch makes a nice, neat line. Start with a stitch in the opposite direction, from A to B. Bring your needle back up at C, just ahead of the first stitch and ending at A. Repeat to make each new stitch meet the end of the previous stitch.
The Stem Stitch got its name because it great for stitching flower stems! Make a stitch from A to B, leaving the floss a little loose. Bring your needle up at C, in between A and B, just to one side. Pull the floss tight and continue the line of stitches.
The Split Stitch quick and versatile. Make a small stitch from A to B, then bring your needle up at C, splitting the stitch in two. Make another small stitch and continue down the line.
Here's a closer look at the Back, Stem and Split Stitches:
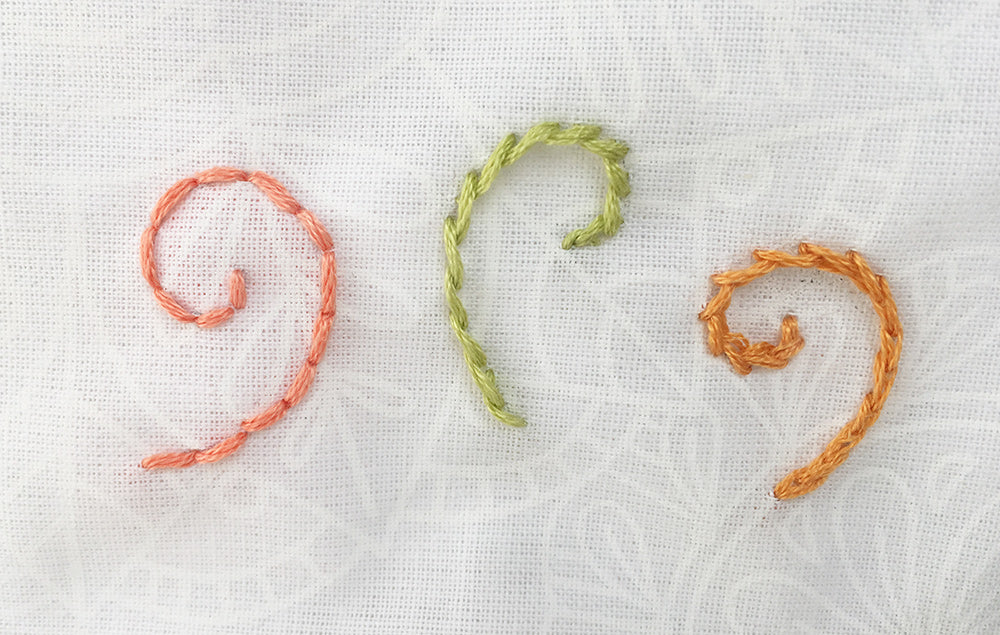
Using a variety of different stitches adds interest to your embroidery. Here are a few Decorative Stitches to try, the Fly Stitch, Lazy Daisy and Scallop Stitch. They are all made in a similar way, by leaving a loose loop of floss and then securing it to the fabric with a stitch over the end of the loop.

The Fly Stitch makes a Y shape, or a cute little flower stem. (You can add the center of the flower with a French Knot or Satin Stitch.) Bring the needle up through the fabric at A, and back down a little ways away at B, but leave a small loop instead of pulling the floss all the way through. Hold the loop flat to the fabric, and bring the needle back up at C, in the middle of the loop. Make another stitch from C to D, forming the stem of the Y shape.
The Lazy Daisy is a teardrop shape perfect for tiny flower petals or leaves. Bring the needle through the fabric at A and back down in the same spot or very close to it, again, leaving a small loop instead of pulling the floss all the way through. Hold the loop flat and make a small stitch over the end of the loop from B to C, securing it to the fabric.
The Scallop Stitch is very similar to the Fly and Lazy Daisy, make a stitch loop from A to B, then secure it to the fabric with a tiny stitch from D to C. You can make Scallop Stitches in a row as a pretty border or edging, or make them in a circle with a dot in the middle for a flower shape.
Here's a closer look at the Fly, Lazy Daisy and Scallop Stitches (with Satin Stitches for the flower centers):

Great job! Ready for more? Try out some more unique embroidery stitches in the Embroidery DIY tutorials!
Come visit the little dear shop and pick out a unique Kit, Sampler or PDF pattern download to try out your new stitching expertise.


