More Stitches
If you've already tried out some basic embroidery stitches (visit the Embroidery DIY tutorials for easy lessons) let's learn some beautiful stitches for creating embroidered florals and rich details.
First up, the classy but infamous French Knot! These guys are sometimes a little tricky at first but are well worth learning. Once you get the hang of them, they'll pop up everywhere in your embroidery projects. They make perfect little flower centers, and interesting textures when grouped close together.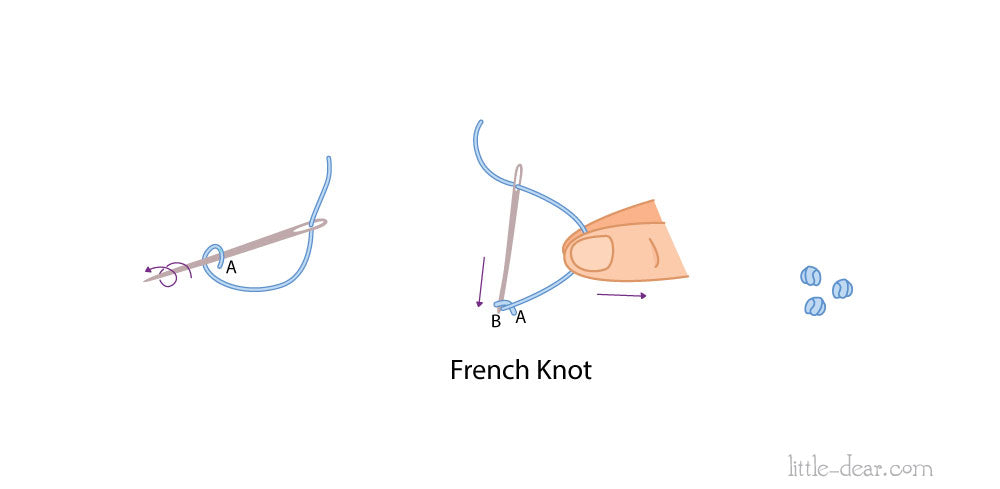
Bring your needle and floss through the fabric at A, then wrap the floss around the tip of the needle as shown. Wrap just once for a small knot, 2-3 times for a larger one. Put the needle back into the fabric at B, right next to A and pull the floss tightly close to the fabric as you pull the needle all the way through, securing the knot to the fabric.
Here's a closer look at some French Knots:

Next let's learn the Woven Spider's Wheel,
(also called the Woven Wheel, or Woven Rose.) It's perfect for stitching bold circles and flowers.

Start by making an odd number of Straight Stitches (usually five or seven) in a star shape out from a center point. Make the spokes each about 1/4 inch long, or half as wide as you want your Wheel to be. Bring your needle and floss up at the center between two spokes and slide them over one stitch and under the next on the surface of the fabric, not through it.

Weave the floss around and around the circle until you reach the outer ends of the spokes. You can use fewer rounds for a flatter circle, or pack in many rounds for a puffy flower.

Here are some examples of Woven Roses. Add a large French Knot in the center and Lazy Daisy or Satin Stitch leaves to make a perfect flower.

Click Here to learn more about Woven Roses and 3 different rose stitches as well!

Whipped Spider's Wheel
The Whipped Spider's Wheel (or Whipped Wheel) is similar to the Woven version except you’ll whip your stitches over and under each spoke.

Start with a Straight Stitched star, then bring your needle up between two spokes at the center. Take your needle back over one spoke and forwards under two spokes, continuing all around the circle until it is full.

Bullion Knots
Here is another type of rose, the Bullion Rose. Stitched with Bullion Knots, which are similar to French Knots, Bullion Roses are a unique addition to your stitched embroidered bouquet.

Start by bringing the needle out of the fabric at A. Make a stitch about 1/4 inch (6 mm) wide from B to C (close to A.) This will be the length of your Bullion Knot.

While the end of the needle is sticking out of the fabric, wrap floss around the needle five to seven times.

Now slowly pull the needle and floss through the wraps while you hold them loosely between your thumb and forefinger. Reinsert the needle into the fabric, pulling the coil of wraps flat.
Stitch several Bullion Knots pointing out from a center point to make a flower or star shape, or stitch several curving around each other to make Bullion Roses. Here are some examples of Bullion Knots:

Click Here to learn more about Bullion Roses and 3 other rose stitches as well!
Fishbone Stitch
All flowers have leaves, so here is a fun leaf shape to stitch alongside your flowers. This stitch is called the Fishbone Stitch.

Start by drawing a simple leaf shape pattern to follow, pointed at one or both ends. Make a Straight Stitch from the top to the bottom of the shape.

Now bring your needle and floss up just to the left side of the top at A, moving downward and across the center line, just to the right side of it at B.
Then bring the needle and floss up again just to the right of the top point at C, and back down and across to the left side at D. Bring the needle and floss up again just below the A stitch at E, following your pattern and continue criss-crossing stitches all the way down until the leaf is complete.

Here are some examples of Fishbone Stitch leaves. You can space your stitches apart, or make them close together for a more solid leaf.

Long and Short Stitch
Sometimes also called the Brick Stitch, this stitch is used to fill in large areas with solid stitching. It is very versatile, and can be used for Thread Painting, or blending several colors together, just as you would with paint or colored pencil.
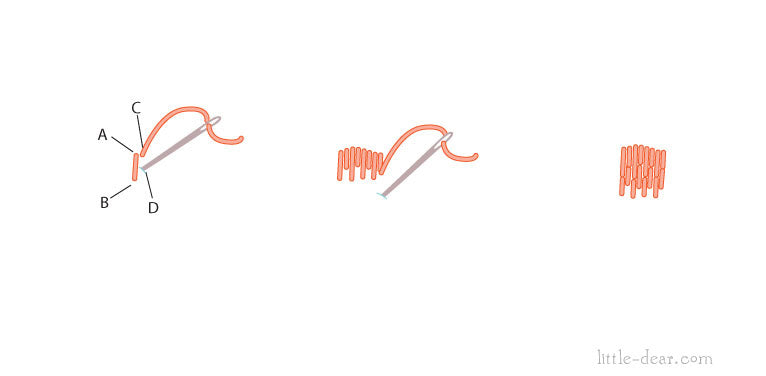
Start the first row by making a stitch from A to B. Next, make another stitch right next to the first one from C to D, only half as long. Make another long stitch, then a short one, and continue alternating between the two stitches to form the first row.

Only the first row has both Long and Short Stitches; the rest of the stitches will all be roughly the same length. For the second row, make stitches just below the first row of stitches, filling in any spaces. Unless you’re stitching a perfect square of Long and Short Stitches, they probably won’t all be perfectly uniform, and that is just fine. Add a stitch here and there to fill in any gaps as you go along. Just keep all your stitches going in the same direction, and you’ll have an evenly filled area when you’re finished.

To blend your stitches from one color to another, just change colors to a lighter or darker shade with each row or two.
Here are some examples of Long and Short Stitches:


When "painting" with thread, use the Long and Short Stitch instructions here as a starting point, but feel free to add or change colors, lengths and spacing of stitches as needed. Try using fewer threads for smaller details, and angling your stitches to follow the shapes in the image you’re stitching.
Click Here for another useful tutorial for Thread Painting with the Long and Short stitch!
Blanket Stitch
and Buttonhole Wheel are stitched the same way, one in a straight line and one in a circle.
Bring the needle up at A and make a loose stitch from A to B, your center point. Catch the stitch under your needle at C, pulling it tight to the fabric. You can use this stitch as a border at or over the edge of fabric, or make them in a circle for a Buttonhole Wheel.

Couching
Couching is stitching a loose piece of floss to the surface of your fabric. You can also use couching to attach yarn, cord or thin ribbon.

Arrange a piece of floss on the pattern line and use 1-2 threads to stitch it down. Use thread the same color to hide the stitches or a contrasting color to show them off.

Great job! You are well on your way to creating some fun and unique embroidery art.
Come visit the shop and pick out a unique Kit, Sampler or PDF pattern download to try out your new stitching expertise!


